CrowdSec WAF Reverse Proxy
Introduction
In this guide, we will showcase how to deploy the CrowdSec WAF with Nginx reverse proxy, easily protecting a fleet of other web applications from a single point.
We will set up a reverse proxy (Nginx) protected with CrowdSec in front of our web server (Apache) to block malicious traffic before it reaches our application.
This article dives into the technical details of configuring CrowdSec WAF.
To achieve robust protection, we'll use two key components that work in tandem: the Security Engine and the Web Application Firewall (WAF) – enabled by an WAF-capable Remediation Component aka Bouncer, in our case, CrowdSec’s NGINX Bouncer
The Security Engine: excels at identifying persistent or recurring behaviours. It analyzes your web server/reverse proxy logs to identify suspicious patterns of behavior. For example, the http-probing scenario detects IPs rapidly requesting a large number of non-existent files – a common tactic used by vulnerability scanners searching known vulnerabilities, backdoors, or publicly exposed admin interfaces. While powerful and able to protect a large number service from various log sources, the Security Engine reacts after the request have been processed by your web server.
The Web Application Firewall (WAF): The WAF acts as your immediate response, blocking malicious requests before they even reach your application or backend. With the help of the bouncer/remediation component relaying the requests to the AppSec engine, it will apply virtual patching rules to block requests that are, without a doubt, malevolent. A great example is the vpatch-env-access rule, which blocks requests attempting to access .env files (which should never be publicly accessible!). Our vpatching collection has hundreds of rules tailored to precisely block vulnerability attempts.
Virtual Patching Rules focus on detecting and preventing the exploitation of a specific vulnerability, allowing very minimal risk of false positives.
Together, these components provide layered protection, making it significantly harder for attackers to succeed.
WAFs are powerful, but no matter what WAF vendors make you believe, determined attackers can often find ways to bypass your WAF configuration. Here, the Security Engine will rely on the WAF detection to make longer-term decisions against repeating malevolent IPs.
Initial Setup
For our experiment, we’ll set up two Ubuntu 24.04 servers. One will be creatively called webserver, and the other will be called nginx-RP. We’ll install apache on webserver, configured to listen on port 3000, and nginx on nginx-RP. webserver has IP Y.Y.Y.Y, while nginx-RP has IP X.X.X.X.
We'll deploy the following configuration for nginx as a reverse proxy.
/etc/nginx/sites-enabled/default
server {
    listen 80;

    server_name _;

    location / {
        proxy_pass http://Y.Y.Y.Y:3000;  # Allows passing requests to the backend web server.
    	proxy_set_header X-Real-IP $remote_addr; # Important to keep track of the original IP.
        proxy_http_version 1.1;
        proxy_set_header Upgrade $http_upgrade;
        proxy_set_header Connection 'upgrade';
        proxy_set_header Host $host;
        proxy_cache_bypass $http_upgrade;
    }
}
And the following Apache config:
/etc/apache2/sites-enabled/000-default.conf
<VirtualHost *:3000>
	# The ServerName directive sets the request scheme, hostname and port that
	# the server uses to identify itself. This is used when creating
	# redirection URLs. In the context of virtual hosts, the ServerName
	# specifies what hostname must appear in the request's Host: header to
	# match this virtual host. For the default virtual host (this file) this
	# value is not decisive as it is used as a last resort host regardless.
	# However, you must set it for any further virtual host explicitly.
	#ServerName www.example.com

	ServerAdmin webmaster@localhost
	DocumentRoot /var/www/html

	RemoteIPHeader X-Real-IP
	RemoteIPTrustedProxy X.X.X.X

	# Available loglevels: trace8, ..., trace1, debug, info, notice, warn,
	# error, crit, alert, emerg.
	# It is also possible to configure the loglevel for particular
	# modules, e.g.
	#LogLevel info ssl:warn

	ErrorLog ${APACHE_LOG_DIR}/error.log
	CustomLog ${APACHE_LOG_DIR}/access.log combined

	# For most configuration files from conf-available/, which are
	# enabled or disabled at a global level, it is possible to
	# include a line for only one particular virtual host. For example the
	# following line enables the CGI configuration for this host only
	# after it has been globally disabled with "a2disconf".
	#Include conf-available/serve-cgi-bin.conf
</VirtualHost>
💡The two relevant parts here are VirtualHost *:3000 to make Apache listen on port 3000, and RemoteIPHeader + RemoteIPTrustedProxy to ensure our logs contain the real IPs and not only the IP of the reverse proxy server.
So, if we now access the public IP of our reverse proxy, we’ll see Apache’s default page.
We do have our Nginx logs:
==> /var/log/nginx/access.log <==
A.B.C.D - - [22/May/2025:08:32:49 +0000] "GET / HTTP/1.1" 200 3121 "-" "Mozilla/5.0 (X11; Linux x86_64) AppleWebKit/537.36 (KHTML, like Gecko) Chrome/136.0.0.0 Safari/537.36"
A.B.C.D - - [22/May/2025:08:32:49 +0000] "GET /icons/ubuntu-logo.png HTTP/1.1" 200 3322 "http://3.252.135.216/" "Mozilla/5.0 (X11; Linux x86_64) AppleWebKit/537.36 (KHTML, like Gecko) Chrome/136.0.0.0 Safari/537.36"
A.B.C.D - - [22/May/2025:08:32:50 +0000] "GET /favicon.ico HTTP/1.1" 404 245 "http://3.252.135.216/" "Mozilla/5.0 (X11; Linux x86_64) AppleWebKit/537.36 (KHTML, like Gecko) Chrome/136.0.0.0 Safari/537.36"
And the Apache logs:
==> /var/log/apache2/access.log <==
A.B.C.D - - [22/May/2025:08:32:49 +0000] "GET / HTTP/1.1" 200 3404 "-" "Mozilla/5.0 (X11; Linux x86_64) AppleWebKit/537.36 (KHTML, like Gecko) Chrome/136.0.0.0 Safari/537.36"
A.B.C.D - - [22/May/2025:08:32:49 +0000] "GET /icons/ubuntu-logo.png HTTP/1.1" 200 3552 "http://3.252.135.216/" "Mozilla/5.0 (X11; Linux x86_64) AppleWebKit/537.36 (KHTML, like Gecko) Chrome/136.0.0.0 Safari/537.36"
A.B.C.D - - [22/May/2025:08:32:50 +0000] "GET /favicon.ico HTTP/1.1" 404 438 "http://3.252.135.216/" "Mozilla/5.0 (X11; Linux x86_64) AppleWebKit/537.36 (KHTML, like Gecko) Chrome/136.0.0.0 Safari/537.36"
At this stage, check that both Apache's and Nginx's logs are the real originating IP (ie. A.B.C.D)
Time to level up our security - Security Engine
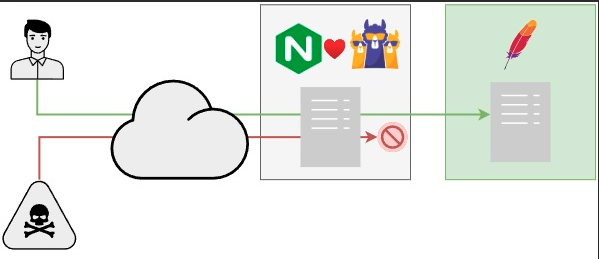
As soon as our server is online, hordes of malevolent IPs will jump on it with clear bad intentions. What is currently happening is this:

Thus, it is time to step up our security with CrowdSec. We will deploy the Security Engine, the WAF, and an Nginx bouncer on our Reverse Proxy server so that we can achieve this:
To install CrowdSec on our reverse proxy, let’s grab the crowdsec repository:
curl -s https://install.crowdsec.net | sudo sh
And let’s install crowdsec:
sudo apt install crowdsec
The relevant part of the install log is the following:
Creating /etc/crowdsec/acquis.yaml
INFO[2025-05-22 09:40:27] crowdsec_wizard: service 'nginx': /var/log/nginx/error.log /var/log/nginx/access.log
INFO[2025-05-22 09:40:27] crowdsec_wizard: service 'ssh': /var/log/auth.log
INFO[2025-05-22 09:40:27] crowdsec_wizard: service 'linux': /var/log/syslog /var/log/kern.log
It detected we’re running nginx, and will automatically install the relevant scenarios and start monitoring the associated logfiles!
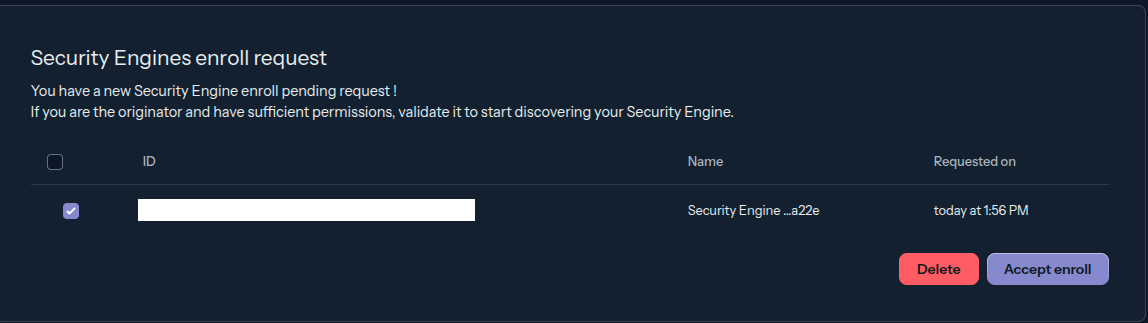
Then, we will enrol the SE in the console:

Accept it in the console:
Detecting is cool, blocking is better.
To complete our setup, we need the ability to block bad IPs and requests before they reach Apache, our backend server. We will install the Nginx bouncer (or remediation component) for this. The bouncer can block IPs when instructed by CrowdSec. As simple as this:
sudo apt install crowdsec-nginx-bouncer
What matters in the installation output is that:
cscli is /usr/bin/cscli
cscli/crowdsec is present, generating API key
API Key : <REDACTED>
Restart nginx to enable the crowdsec bouncer : sudo systemctl restart nginx
The bouncer installation detects a running CrowdSec on the same machine and in this case it will self-configure.
Testing 🙂
From a 3rd-party machine, let’s try to trigger our newly deployed crowdsec. We're going to use the dedicated crowdsecurity/http-generic-test to ensure our logs are properly processed:
curl http://Y.Y.Y.Y/crowdsec-test-NtktlJHV4TfBSK3wvlhiOBnl
On our reverse-proxy logs, we can see in CrowdSec and nginx:
==> /var/log/crowdsec.log <==
time="2025-08-06T13:06:44Z" level=info msg="Ip A.B.C.D performed 'crowdsecurity/http-generic-test' (1 events over 0s) at 2025-08-06 13:06:44.35424178 +0000 UTC"
time="2025-08-06T13:06:44Z" level=info msg="(3ef52352a7e54c92b4394646a32bc095auADzhivHUYuhyJb) alert : crowdsecurity/http-generic-test by ip A.B.C.D (FR/5410)"
Going further - Web Application Firewall
However, this approach has a limit: CrowdSec reads logs and acts based on their content, which means that you somehow react to an attack that has already happened. We want to intercept malevolent requests “on the fly” so that they never reach our backend server, Apache. This is the job of the WAF:
We follow this quickstart guide :
- We install the appsec collection. They contain the WAF rules
sudo cscli collections install crowdsecurity/appsec-virtual-patching crowdsecurity/appsec-generic-rules
- We enable the AppSec/WAF acquisition, which allows CrowdSec to expose a service to which Nginx can post validation requests.
cat > /etc/crowdsec/acquis.d/appsec.yaml << EOF
appsec_config: crowdsecurity/appsec-default
labels:
  type: appsec
listen_addr: 127.0.0.1:7422
source: appsec
EOF
- We restart CrowdSec
sudo systemctl restart crowdsec
- We instruct our nginx bouncer/remediation component to rely on CrowdSec for the WAF feature:
cat >> /etc/crowdsec/bouncers/crowdsec-nginx-bouncer.conf << EOF
APPSEC_URL=http://127.0.0.1:7422
EOF
- Finally, we restart nginx
sudo systemctl restart nginx
Testing the WAF
So now, we can try to trigger the WAF:
$ curl -I Y.Y.Y.Y/.env
HTTP/1.1 403 Forbidden
Server: nginx/1.24.0 (Ubuntu)
Date: Fri, 23 May 2025 12:18:24 GMT
Content-Type: text/html
Connection: keep-alive
cache-control: no-cache
And indeed in CrowdSec’s logs:
==> /var/log/crowdsec.log <==
time="2025-05-23T12:18:24Z" level=info msg="AppSec block: crowdsecurity/vpatch-env-access from A.B.C.D (127.0.0.1)"

==> /var/log/nginx/error.log <==
2025/05/23 12:18:24 [alert] 25451#25451: *443 [lua] crowdsec.lua:637: Allow(): [Crowdsec] denied 'A.B.C.D' with 'ban' (by appsec), client: A.B.C.D, server: _, request: "HEAD /.env HTTP/1.1", host: "X.X.X.X"

==> /var/log/nginx/access.log <==
A.B.C.D - - [23/May/2025:12:18:24 +0000] "HEAD /.env HTTP/1.1" 403 0 "-" "curl/8.5.0"
In this case, the WAF is going to stop the request, meaning the malevolent request will never reach our backend web server, Apache.
Wrapping this up
By setting up our reverse proxy with CrowdSec’s WAF and SE in front of our application, we are blocking a massive amount of requests before they even reach our application. These blocks come from various sources: The Security Engine detects and blocks behaviours, banning offending IP addresses for an extended period to avoid them consuming our resources and limiting the chances they manage to breach our application. The WAF stops malevolent requests “on the fly” before they can reach our backend web server, and the community blocklist completes both by preemptively blocking malicious IPs.